How to Pair AirPods with Dell Laptops – Easy Step-by-Step Guide
Have you ever wondered how to effortlessly synchronize your cutting-edge wireless earbuds with the latest generation of portable computers? Look no further, as this comprehensive guide will elucidate the simple yet elusive process of uniting state-of-the-art wireless earphones with your sleek and responsive laptop device.
The growing trend of wireless earbuds has revolutionized the way we consume audio content, granting us unparalleled freedom of movement. Delve into the realm of wire-free audio bliss as we unveil the intricate steps involved in establishing a seamless connection between your advanced earbuds and the powerful Dell laptop, renowned for its superior performance and unrivaled reliability.
Your quest for a hassle-free pairing experience will be rewarded with this easy-to-follow manual, carefully curated to eliminate any confusion or frustration. With the aid of this step-by-step guide, you will embark on a journey of audio transcendence, unlocking the full potential of your Dell laptop and wireless earbuds as they harmoniously unite to enrich your auditory experience like never before.
Connecting AirPods to Dell Laptops: The Basics
When it comes to using wireless headphones with your Dell laptop, understanding the fundamentals of connecting your AirPods can make all the difference. This section will guide you through the essential steps to effortlessly establish a seamless connection between your AirPods and Dell laptops.
Step 1: Enable Bluetooth
The first step in connecting your AirPods to your Dell laptop is to ensure that the Bluetooth function is enabled. Bluetooth allows your laptop to communicate with your AirPods wirelessly.
Step 2: Access Bluetooth Settings
Next, you will need to access the Bluetooth settings on your Dell laptop. These settings will allow you to search for and pair with your AirPods.
By following these simple steps, you will be ready to enjoy the convenience and freedom of wireless audio with your Dell laptop and AirPods. The detailed instructions provided in the subsequent sections will walk you through each step with clarity and ease.
Checking Compatibility
Before attempting to connect your wireless earbuds to your laptop, it is crucial to ensure that the devices are compatible with each other. Ensuring compatibility will prevent any issues or disappointments that may arise during the pairing process.
- Verify the Bluetooth version of your Dell laptop: The first step is to check the Bluetooth version of your Dell laptop. Different Bluetooth versions may have varying compatibility levels with wireless earbuds. Refer to the laptop’s user manual or specifications to find the Bluetooth version.
- Confirm support for Bluetooth audio devices: Ensure that your Dell laptop supports Bluetooth audio devices, such as wireless earbuds. Some laptops may only support Bluetooth for file transfers and peripheral devices, so it is essential to verify this before proceeding.
- Check the operating system requirements: Apart from Bluetooth compatibility, it is necessary to ensure that the operating system of your Dell laptop meets the requirements for connecting wireless earbuds. Certain operating systems may have limitations or specific instructions for pairing Bluetooth devices.
- Review the wireless earbuds’ compatibility: It is equally important to check if your specific model of wireless earbuds is compatible with Dell laptops. Some earbuds may have specific requirements or limitations when connecting to laptops, so referring to the manufacturer’s website or documentation is recommended.
- Research compatibility issues: To avoid potential problems, it is advisable to research any known compatibility issues between Dell laptops and AirPods or other wireless earbuds. Online forums and customer reviews can provide valuable insights into the experiences of other users.
By thoroughly checking compatibility between your Dell laptop and wireless earbuds in advance, you can ensure a smooth and successful pairing process without encountering any unexpected hurdles or challenges.
Ensuring Compatibility of Your Dell Laptop for Seamless AirPods Integration
Before embarking on the journey of pairing your AirPods with your Dell laptop, it is essential to confirm the compatibility of your device. Ensuring that your Dell laptop supports the seamless integration of AirPods will guarantee a hassle-free experience in using these wireless earbuds with your laptop.
Here are a few steps to verify if your Dell laptop is compatible with AirPods:
- Check the Bluetooth version: AirPods rely on Bluetooth technology to establish a connection. Ensure that your Dell laptop has Bluetooth capabilities and supports Bluetooth 4.0 or later versions for optimal compatibility.
- Verify the operating system requirements: AirPods are designed to work seamlessly with various operating systems. Confirm that your Dell laptop operates on a compatible OS, such as Windows 10 or macOS Sierra, to ensure a smooth pairing process.
- Inspect the hardware specifications: Certain hardware components of your Dell laptop can influence the compatibility with AirPods. Make sure that your laptop has the necessary hardware, such as a Bluetooth module, to enable the wireless connection.
- Update device drivers: Outdated or incompatible drivers can hinder the pairing process between AirPods and your Dell laptop. Visit the Dell support website and download the latest drivers for your laptop model to stay up to date and maximize compatibility.
- Troubleshoot known issues: Dell laptops may encounter specific issues while pairing with AirPods. Research common problems and their solutions, such as connection drops or audio quality, to preemptively address any potential complications.
By verifying the compatibility of your Dell laptop, you ensure a seamless integration with AirPods, unlocking the convenience and advanced features that these wireless earbuds offer. Following the steps outlined above will enable you to enjoy a high-quality audio experience without any connectivity or compatibility issues.
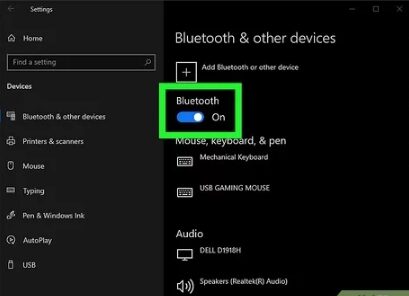
Activating Bluetooth
In this section, we will explore the process of enabling Bluetooth functionality on your Dell laptop. By activating Bluetooth, you will be able to establish wireless connections with compatible devices and enjoy the convenience of wire-free communication.
Enabling Bluetooth on your Dell laptop involves a few simple steps. Follow the instructions below to activate Bluetooth and begin connecting to Bluetooth-enabled devices:
| Step 1 | Open the Start menu by clicking on the Windows icon located in the bottom-left corner of your screen. |
| Step 2 | Select “Settings” from the Start menu to open the Windows Settings page. |
| Step 3 | Within the Settings page, locate and click on the “Devices” option. |
| Step 4 | In the Devices menu, select the “Bluetooth & other devices” tab from the left-hand navigation pane. |
| Step 5 | Toggle the switch under the “Bluetooth” section to the “On” position. |
| Step 6 | Your Dell laptop is now Bluetooth-enabled and ready to establish connections with compatible devices! |
By following these steps, you have successfully activated Bluetooth on your Dell laptop. Now, you can start pairing and connecting with various Bluetooth devices such as speakers, headphones, smartphones, and more.
Remember to keep your Bluetooth settings enabled whenever you wish to connect to a Bluetooth device. Disabling Bluetooth when not in use can help conserve battery life and enhance your laptop’s overall performance.
With Bluetooth activated on your Dell laptop, you can now explore a world of wireless possibilities and experience the convenience of seamless connectivity with compatible devices.
Enabling Bluetooth on Your Dell Laptop
Ensuring that your Dell laptop is equipped with Bluetooth technology is essential for seamless connectivity and enhanced functionality. In this section, we will guide you through the process of activating Bluetooth on your Dell laptop, allowing you to take advantage of a wide range of wireless devices and accessories.
Checking Bluetooth Availability
Before enabling Bluetooth on your Dell laptop, it is important to confirm if your device has built-in Bluetooth capabilities. You can do this by accessing the device’s settings or control panel. Look for the Bluetooth icon or navigate to the “Bluetooth & other devices” section, where you can find relevant information about the status of Bluetooth on your laptop. If Bluetooth is not listed or mentioned, don’t worry. You may still be able to enable it using an external Bluetooth adapter.
Activating Bluetooth
Once you have confirmed Bluetooth availability, follow these simple steps to activate Bluetooth on your Dell laptop:
- Accessing Settings: Open the Windows Start menu and click on the gear icon to access the Settings menu.
- Selecting Devices: Within the Settings menu, look for the “Devices” option and click on it to proceed.
- Enabling Bluetooth: In the Devices menu, locate and click on the “Bluetooth & other devices” tab. Toggle the switch to enable Bluetooth functionality.
- Pairing Devices: Once Bluetooth is enabled, you can pair it with various wireless devices by clicking on the “Add Bluetooth or other device” button and following the on-screen instructions.
By enabling Bluetooth on your Dell laptop, you unlock the potential to connect wirelessly with a multitude of devices, including speakers, headphones, keyboards, and mice. Whether you want to enjoy music without the hassle of wires or increase productivity by utilizing wireless peripherals, this easy-to-follow guide ensures you are well on your way to a seamlessly connected experience.
Putting AirPods in Pairing Mode
In order to establish a connection between your wireless earbuds and a compatible device, it is necessary to activate the pairing mode on the AirPods. This mode allows the AirPods to be discoverable and ready to connect with your desired device.
To initiate the process, you need to ensure that your AirPods are not currently connected to any device. Take them out of their charging case and make sure they are fully charged and ready for pairing. Once completed, follow the steps below to put your AirPods in pairing mode:
- Double-Tap Action:Begin by double-tapping either of the AirPods. This action triggers a specific function that can be customized based on your preference, but for this purpose, it will serve as the key for entering pairing mode.
- Siri Function:Alternatively, if you have enabled Siri on your AirPods, you can trigger pairing mode by voice command. Activate Siri by saying “Hey Siri” or pressing and holding the designated button on the AirPods, and instruct Siri to “Enter Pairing Mode.”
- Manual Activation:If the above methods do not work, you can manually enable pairing mode. Locate the small button, usually located on the back of the AirPods charging case, and press and hold it for a few seconds. This should activate the pairing mode, indicated by the LED light on the case flashing white.
- Verification:After following one of the above steps, check the Bluetooth settings on your Dell laptop or other compatible device. The AirPods should appear in the list of available devices for connection.
By putting your AirPods in pairing mode, you have prepared them to establish a connection with your Dell laptop or any other device capable of wireless Bluetooth connections. Ensure that you follow the appropriate pairing instructions for your specific device to complete the connection process successfully.
Preparing Your AirPods for Connection
Before you can connect your wireless earbuds to your Dell laptop, there are a few necessary steps you need to take to ensure a smooth and seamless pairing process. By following these instructions, you can prepare your earbuds for a successful connection without any complications.
Step 1: Make sure that your AirPods are charged and ready for pairing. A fully charged set of earbuds ensures uninterrupted connectivity and optimal performance. Connect your AirPods to their charging case and ensure that they are properly charged before proceeding.
Step 2: Ensure that Bluetooth is enabled on your Dell laptop. To do this, navigate to the settings menu and find the Bluetooth options. Enable Bluetooth to allow your laptop to discover and connect with nearby devices.
Step 3: Put your AirPods in pairing mode. This mode allows your earbuds to be discoverable by other devices, including your laptop. Locate the button on the back of the AirPods charging case and press and hold it until the LED light on the case starts blinking white. This indicates that your AirPods are now in pairing mode.
Step 4: Once your AirPods are in pairing mode, go to the Bluetooth settings on your Dell laptop. It should now detect your AirPods as an available device for connection. Select your AirPods from the list of available devices to initiate the pairing process.
Step 5: Follow any on-screen instructions that may appear to complete the pairing process. Your laptop may ask you to confirm a passkey or PIN to establish a secure connection between your AirPods and the laptop. Simply follow the prompts and enter the required information to finalize the pairing.
Step 6: Once the pairing process is complete, your Dell laptop will display a confirmation message indicating a successful connection with your AirPods. You can now enjoy wireless audio playback and communication using your AirPods with your Dell laptop.
By carefully preparing your AirPods for connection, you can ensure a hassle-free pairing experience and enjoy the convenience of wirelessly using your earbuds with your Dell laptop.
Pairing AirPods with Your Dell Laptop
Connecting your wireless earbuds to your Dell laptop has never been easier! This guide will take you through the simple steps of establishing a seamless connection between your AirPods and your Dell laptop, enabling you to enjoy your favorite audio content without any hassle.
Step 1: Ensuring Compatibility
Before proceeding with the pairing process, it is crucial to confirm that your Dell laptop supports Bluetooth connectivity. Check your laptop’s specifications or refer to the user manual for verification. Bluetooth compatibility is essential to establish a successful connection with your AirPods.
Step 2: Enabling Bluetooth on Your Dell Laptop
Once you have confirmed Bluetooth support on your Dell laptop, it’s time to enable the feature. Navigate to the settings menu on your laptop and locate the Bluetooth section. Ensure that Bluetooth is turned on and visible to other devices. This will allow your AirPods to detect and establish a connection with your Dell laptop.
Note: It’s recommended to keep your AirPods charged and in close proximity to your laptop during the pairing process to ensure a smooth connection.
With these initial steps completed, you are now ready to pair your AirPods with your Dell laptop. The next section will guide you through the final steps, establishing a seamless wireless connection that will enhance your audio experience and provide you with the freedom to enjoy your favorite content without the constraints of wired headphones.
Question and answer: How to pair airpods with dell laptops
How do you connect AirPods to a Windows 11 laptop?
To connect AirPods to a Windows 11 laptop, open the AirPods case, then hold the setup button on the back of the case until the LED light starts blinking white. On your laptop, click the Windows logo and go to Settings > Devices > Bluetooth & other devices > Add Bluetooth or other device > Bluetooth. Select your AirPods from the list of available Bluetooth devices, and wait a few seconds until the device is ready to go.
What steps should you take to connect AirPods Pro to a Dell Latitude running Windows 10?
To connect AirPods Pro to a Dell Latitude running Windows 10, first ensure Bluetooth is enabled on your laptop. Open your AirPods Pro case, press and hold the circular button on the back until the light blinks white, indicating pairing mode. On your Dell Latitude, navigate to Settings > Devices > Bluetooth & other devices > Add device > Bluetooth, select your AirPods Pro from the list to connect.
Can you use AirPods with a Windows PC without any additional software?
Yes, you can use AirPods with a Windows PC via Bluetooth without any additional software. Simply put the AirPods into pairing mode by holding the button on the back of the case, then pair them through the Bluetooth settings on your Windows PC.
How do you disconnect AirPods from a Windows laptop?
To disconnect AirPods from a Windows laptop, go to Settings > Devices > Bluetooth & other devices. Find your AirPods listed under the Bluetooth section, click on them, and select “Remove device.” Confirm the removal to disconnect your AirPods.
What are the differences in connecting AirPods to a MacBook compared to a Windows laptop?
Connecting AirPods to a MacBook typically involves fewer steps than a Windows laptop due to the integrated ecosystem. On a MacBook, simply open the AirPods case near the device with Bluetooth enabled, and they should automatically connect. On a Windows laptop, you must manually add the AirPods via the Bluetooth settings as described previously.
How can you ensure your AirPods automatically connect to your Windows PC each time?
To ensure your AirPods automatically connect to your Windows PC each time, pair them once via Bluetooth. Once paired, your AirPods should automatically connect when they are taken out of their case and Bluetooth is enabled on your PC.
How do you find your AirPods if they are lost near your Apple device?
If you have lost your AirPods near your Apple device and they are still connected, use the “Find My” app on your device. This app will show a map with the location of your AirPods or play a sound to help you locate them.
What should you do if you’re trying to connect your AirPods and they do not appear in the list of available Bluetooth devices?
If you’re trying to connect your AirPods and they do not appear in the list of available Bluetooth devices, make sure your AirPods are in pairing mode with the case open and the button on the back held until the light blinks white. Also, ensure that your computer’s Bluetooth is turned on and actively searching for devices.
Is there a way to check the battery status of AirPods on a Windows laptop?
While Windows does not have native support to check the battery status of AirPods, you can download third-party applications from the Microsoft Store or other trusted sources that allow you to see the battery levels of connected Bluetooth devices.
Can you control the playback on your Dell computer using AirPods?
AirPods can control playback on a Dell computer to an extent, depending on the Bluetooth profile supported by the computer’s Bluetooth card. You may be able to play, pause, or skip tracks directly from the AirPods if the AVRCP (Audio/Video Remote Control Profile) is supported.
How do you add a device like Apple AirPods to a Dell laptop running Windows 11?
To add Apple AirPods to a Dell laptop running Windows 11, open the Bluetooth settings by going to Settings > Devices > Bluetooth & other devices. Ensure Bluetooth is on, open your AirPods case with the AirPods inside, and hold the button on the back until the status light starts blinking white. Click “Add Bluetooth or other device,” select “Bluetooth,” and choose your AirPods from the list to connect.
What steps should you follow to connect AirPods to a Windows PC?
To connect AirPods to a Windows PC, ensure Bluetooth is enabled on your computer. Open the AirPods case, press and hold the setup button on the back until the LED flashes white. On your PC, go to Settings > Devices > Bluetooth & other devices > Add device > Bluetooth. Select AirPods from the list of devices, and they should connect.
Can you use AirPods or AirPods Pro with the Apple TV app on a laptop?
Yes, you can use AirPods or AirPods Pro with the Apple TV app on a laptop. Connect your AirPods to the laptop via Bluetooth, open the Apple TV app, and the audio from the app will automatically play through your AirPods.
How do AirPods work when connected to a Dell laptop?
When AirPods are connected to a Dell laptop, they function as a wireless audio output device. You can listen to audio or use them as a sound input device for calls. The laptop routes audio to the AirPods, and they can be controlled from the sound settings or directly from the AirPods.
What should you do to remove AirPods from your list of connected devices on a laptop?
To remove AirPods from your list of connected devices on a laptop, go to Settings > Devices > Bluetooth & other devices. Find your AirPods in the list, click on them, and select “Remove device.” This will disconnect and remove the AirPods from your laptop’s Bluetooth connections.
How can you connect AirPods Max to a PC?
To connect AirPods Max to a PC, first ensure that Bluetooth is enabled on your PC. Open the AirPods Max case and press and hold the noise control button until the status light flashes white, indicating pairing mode. Go to your PC’s Bluetooth settings, find AirPods Max in the device list, and select it to pair.
What is the procedure to see the LED status light on older AirPods when connecting to a computer?
To see the LED status light on older AirPods when connecting to a computer, open the case of the AirPods. The LED status light inside the case will show the current status of the AirPods: flashing white means they are ready to pair, and green indicates they are fully charged.
Where can you find tutorials or guides on how to use the AirPods with different devices on the Apple YouTube channel?
You can find tutorials or guides on how to use AirPods with different devices on the Apple YouTube channel by searching for “AirPods” on the channel. There are videos that provide detailed instructions on pairing, using features like Spatial Audio, and troubleshooting common issues.
How can you ensure that your AirPods connect automatically to your Dell laptop every time?
To ensure that your AirPods connect automatically to your Dell laptop every time, pair them initially through the Bluetooth settings. Once paired, they should automatically connect whenever they are opened near the laptop, provided Bluetooth is active and the AirPods are charged.
What should you do if your AirPods make unexpected noises or don’t connect properly?
If your AirPods make unexpected noises or don’t connect properly, try resetting them by placing them back in their case, closing the lid, waiting a few seconds, and then removing them to reconnect. If issues persist, visit the Apple community forums or contact Apple Support for further assistance.