How To Change Input On MSI Monitor? | Best Guide of 2023
How To Change Input On MSI Monitor Without A Computer. It is very important to keep an eye on your monitor settings when you are using MSI graphics cards as you will be able to optimize your graphics card performance easily.
One of the most common issues that occur with computers and monitors is the issue of input lag. This happens when a computer cannot detect certain inputs from the user because of the input lag. Some of the common factors that lead to this include the type of mouse, the connection, and so on. For example, if you use an optical mouse, lag might occur because it cannot detect movement. In the case of a laptop, the lag might happen because of the fact that it cannot detect keystrokes from the keyboard.
If you are having trouble getting the input settings for an MSP 430 to match what you see on the screen monitor, we have a quick solution for you. This solution will make sure the MSP monitor is properly set up for a PC monitor.
How To Change Input On Msi Monitor?
How do I change the input on my monitor?
- 1) Insert the video card into the computer’s video slot and remove the power supply cord.
- 2) Turn off the PC.
- 3) Open the case of the monitor.
- 4) Remove the four screws on the bottom edge of the monitor.
- 5) Carefully lift the top portion of the monitor out of the computer case.
- 6) Unscrew the two screws on the bottom side of the monitor.
- 7) Lift the monitor out of the computer case.
- 8) Remove the back cover of the monitor.
- 9) Remove the circuit board from the inside of the monitor.
- 10) Remove the LCD panel from the inside of the monitor.
- 11) Carefully pull out the ribbon cables that connect the monitor to the motherboard.
- 12) Disconnect the ribbon cables and place them back into the monitor.
- 13) Connect the power supply cable to the motherboard.
- 14) Turn on the monitor and wait for it to boot up.
- 15) Press the function key to enter the setup menu.
- 16) Select “change input”, then select “change port”.
- 17) Make sure the correct port is selected, then select “OK”.
- 18) Press the function key to exit the setup menu.
- 19) Restart the computer and the monitor
There are two options for changing the input of an MSI laptop. You can either change the input using the physical keyboard or the function keys. The easiest way to change the input on an MSI laptop is to use the function keys. You can find this information in the instructions that came with the laptop. Press the F2 key to enter the setup menu, and then press the arrow keys to move to the Input Device section of the screen. There, you can change the input on the laptop.
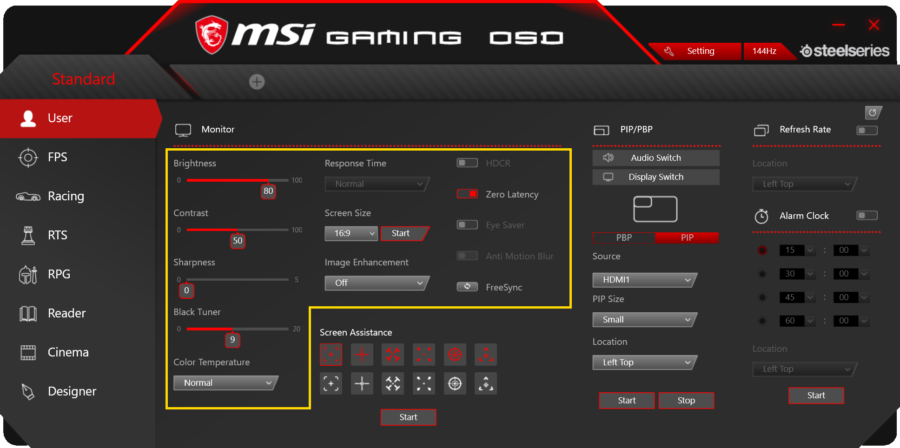
Step 2. The computer monitor is one of the most important parts of the computer. A malfunctioning monitor can ruin your entire computer. Therefore, it is very important to make sure that your monitor works correctly. If you don’t know how to fix it, you can get the help of a technician to fix it. If the problem is too big, you should consider replacing your monitor. The input settings on your monitor are important to its performance. How do I change my MSI monitor settings? You can follow the steps below.
- Step 1: Turn the monitor off.
- Step 2: Unplug the power cord.
- Step 3: Wait about five minutes.
- Step 4: Plug the power cord back into the wall socket.
- Step 5: Start using the computer normally.
Msi monitor won’t switch inputs
There are two ways to fix this problem. One is to change the inputs. For example, if your computer has two video cards, you can select the card that you want. You can also use the keyboard combination CTRL+ALT+DEL. You can also click on the screen icon in the taskbar. It will display a drop-down menu of the possible options. You can select the one that you want.
Msi Optix g27c5 how to change the input?
Msi Optix G27C5 How To Change Input? For those of you who use the MSI Optix G27C5 computer monitor, it seems like there is something wrong with your computer screen. One day you wake up and realize that the colors are too bright and the image looks very fuzzy. Fortunately, you are able to fix the problem. You simply need to adjust the settings on your computer monitor.
Before you can start adjusting the settings, you need to make sure that your laptop or desktop computer is turned on. If you have no idea how to do that, you can simply call the technical support team at MSI Optix. There are some things you should know. For example, you should know that you can only adjust the settings when your computer is off. Also, the display resolution cannot be increased after you have adjusted the settings.
Also Read. How To Reset an EVOO Laptop | Best Solution [2022]
How to switch to HDMI on an MSI laptop?
Follow these easy steps, and everything will be done. First, you need to connect your laptop with an HDMI cable to your TV. Then, you will need to open your laptop and plug the HDMI cable into the port located under the screen. Now, press the power button to turn on your laptop. Then, wait a couple of minutes until your TV is ready to receive video signals.
If you are using Windows, you’ll need to click the Start button on the taskbar and select Device Manager. Click on Display adapters and then click on the HDTV tab. Next, click on the HDMI audio and video settings and click on the Properties button. Now, you can adjust your settings as needed.
How to change the input on MSI Optix G273?

It is very easy to change input settings on MSI Optix G273. All you have to do is press the FN button on your keyboard to access the Input menu. You will find all the settings there. Now, press the right arrow key to switch between the different modes.
How to change HDMI on MSI Optix G27c4?
To change the HDMI port on MSI Optix G27c4, follow the steps below:
- 1. Press the Fn+F2 key together to enter the menu
- 2. Choose System->System Settings
- 3. Choose Sound->Audio Devices
- 4. Find the HDMI device in the list
- 5. Click Set to the right of the HDMI device you want to change.
- 6. Scroll down until you find the item HDMI Audio Device
- 7. Choose the desired sound mode from the list
- 8. Click OK
- 9. Exit the system settings
- 10. Power off the PC and restart
- 11. Connect an HDMI cable to the new HDMI port on the monitor and an HDTV or audio receiver
- 12. Connect power to the new HDMI port
- 13. Turn on the monitor and HDTV
- 14. Open the Sound settings and choose the HDMI device in the list.
- 15. If everything works properly, you can hear the sound on your TV
Sometimes, the MSI menu button will not work. This can happen when the computer is turned off. You can try restarting your computer to see if this solves the problem. In case it does not work, you can try downloading a software program called MSI Control Panel. It’s designed to be able to make changes to the motherboard. You can download it on www.msi.com.
Also Read. How do I Zoom Out On My Toshiba Laptop?
If you have a monitor with a red button on the back, you can use that button to turn the screen off or on. When you press this button, the screen will be turned off. You can turn the screen on again by pressing the same button. If you want to go into standby mode, you can use the standby function. To use it, you have to click the power button on the front of the computer monitor, wait for a few seconds, and press the red button on the back of the monitor.
How do I connect my MSI monitor to HDMI?
To connect an MSI monitor to an HDMI port, you will need to follow some simple steps. First, you will need to find your HDMI cable and plug it into the HDMI port on your computer. Then, turn off the computer. Next, insert your HDMI cable into the HDMI port on your TV. Finally, plug the end of your HDMI cable into your TV. After doing that, it’s time to turn on your TV. Now you can use your computer and watch your video files or games on your TV. This will also allow you to play videos, music, etc. on your computer while watching your TV.
Conclusion!
In conclusion, if you’re looking to change the input of an MSI monitor, you’ll need to go through several different steps. Firstly, you need to determine whether or not the issue lies with the monitor itself or your computer. Next, you’ll need to find out the input settings of the monitor, then try changing those settings. You should always test your monitor’s input settings in case something is wrong. Once you have the correct settings, you’ll want to save them, and once you’ve changed them, you should test again.

![How To Reset a EVOO Laptop? | Best Guide [2023]](https://apkmortgage.com/wp-content/uploads/2023/09/How-To-Reset-a-EVOO-Laptop.jpg)